


DIY Dog Halloween Costumes
How to make two super cute costumes for your dog.
Halloween is just around the corner, and for the dog lovers in Oakton, time is running out to find the perfect costume for your pooch. Don’t worry if you haven’t found the costume fit for you and your dog. I have just the thing for you! A DIY Halloween dog costume! Not only will your dog’s costume be the most unique but it will also have that extra touch of determination and love.
The first Halloween costume that I’ll show you is the Starbucks Drink (modeled by Muffin). This one is pretty simple, all you need is a piece of cardboard (the size will vary based on how big your pup is), a Starbucks disposable travel cup lid, green paint, string, hotglue, scissors, and packaging tape. The first step that you will need to do is cut two small holes in both sides of the travel cup lid. Once you have finished that, thr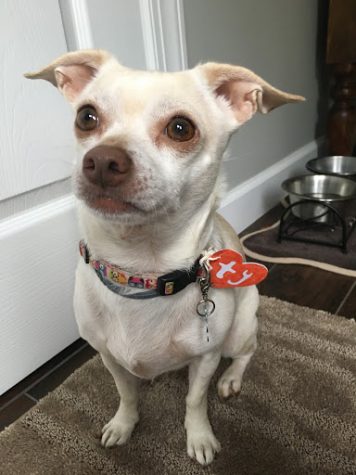 ead the string through the two holes so that the string hangs on the bottom of the lid. Tie the string in knots on both sides and add a dot of hot glue to keep the string in place. This makes the hat for the costume. The next part will be the cup sleeve that will wrap around your dog’s stomach. For this you will need to take the cardboard and cut it into the size and shape that fits your dog. It shouldn’t take up more than two thirds of your dog’s torso. Once you have the shape cut out, grab your green paint and paint the Starbucks logo in the middle of the cardboard. Let the paint dry and then tape the cardboard together while fitting it on your dog so you don’t have to slide it over his/her head. Now you’ll have a cute, little puppuccino prancing around during your Halloween celebrations.
The second costume that you can make is the beanie baby costume (modeled by Snowy). All you need is a red piece of construction paper, some gold glitter glue, string, a sharpie marker, scissors, glue, and white cardstock paper. This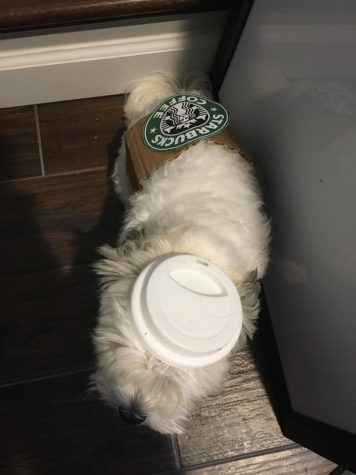 one is super simple, yet really fun and cute. The first step in making this costume is taking the cardstock paper and folding it in half hamburger style. Cut out two hearts so that one side is connected and can open up like a card. Next, take the red paper and cut out a single heart that will cover one side of the white heart card. Glue the red heart on the front side of the heart card and let it dry. Then cut out the letters t and y from another piece of white cardstock. It helps if you are looking at a picture of what the TY tags look like so you get the lettering right. Glue the letters on the front of the (now) red heart card. Trace both the letters and outside of the heart in gold glitter glue and let it dry. Once the tag is finished drying cut a hole in the side of the heart and label the inside of the tag with your pet’s name and what he/she likes to do, then thread string through the hole and attach the string to your dog’s collar and then let him/her show off how cute of a beanie baby they are.
These ideas are super simple and fun to do. They also are great for people on a budget or short on time to search for a costume. If you want more ideas for fun DIY pet costumes look up some ideas on Pinterest and try them out. Have a happy Halloween!

Hello! My name is Maddie Flickinger. I am a sophomore here at Oakton High School and I'm also swimmer with the Oakton swim team. I enjoy reading, writing,...